6 min read
Special Print Finishes FAQ: Foil Stamping, Spot UV & Embossing
A complete FAQ guide on correctly applying special print finishes: metallic foil stamping, spot UV varnish, and 3D embossing.
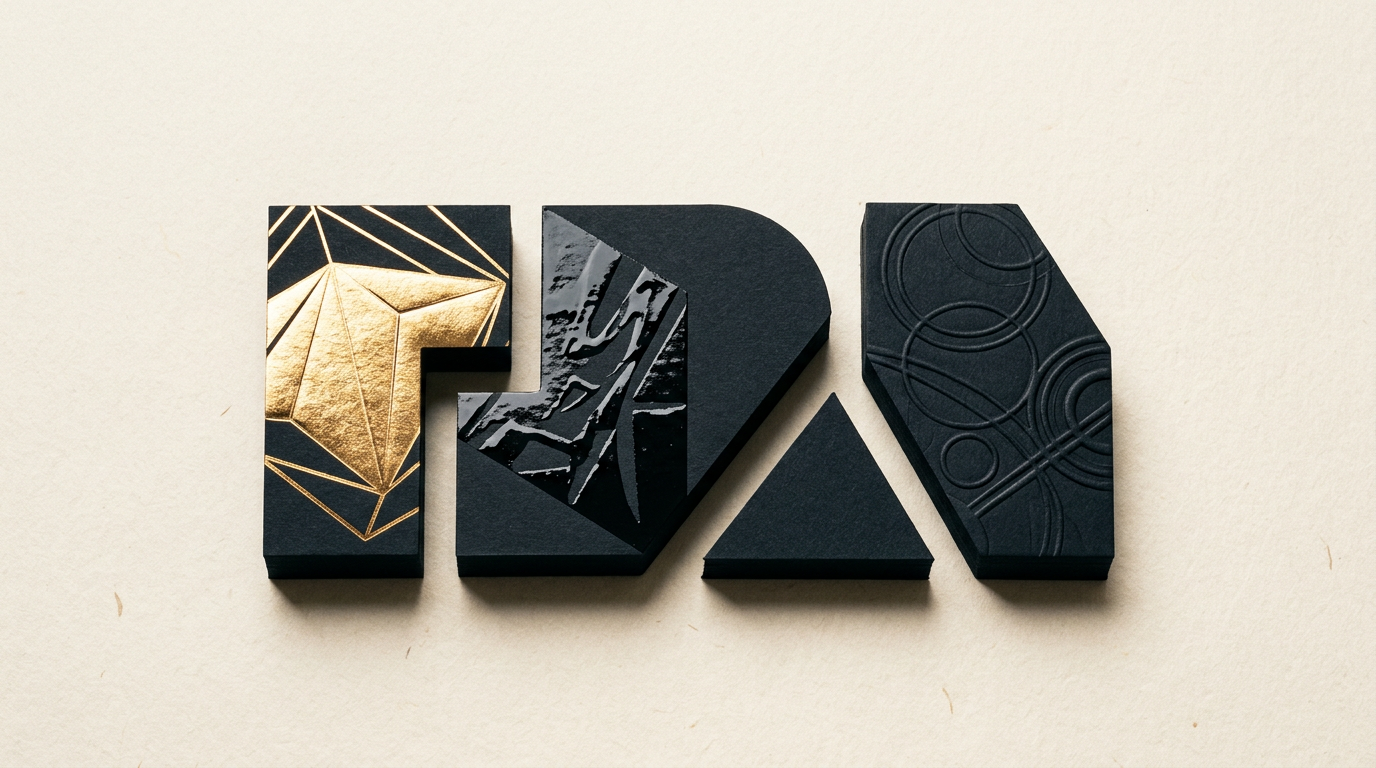
Special finishes turn simple paper substrates into tactile and memorable communication tools. In print, premium details like foil stamping, spot UV, or embossing make the difference between a discarded flyer and a card kept on a client's desk. This guide directly answers the most common technical and financial questions regarding their proper execution.
What are special finishes and when are they worth using in print?
Special finishes are post-press processes that add texture, shine, or dimension to printed materials. They are worth the investment when positioning a brand in the premium segment, particularly for product packaging, business cards, or presentation catalogs. A well-crafted identitate vizuală project multiplies its visual impact when key elements interact with light and touch. Finishes cannot save poor design, but they exponentially elevate well-structured graphics. They are recommended on cardstock over 300 gsm or rigid packaging substrates. If your goal is basic mass distribution (like promotional discount flyers), special finishes are not economically justified. However, for corporate folders, wine labels, cosmetic boxes, or event invitations, a correctly applied detail increases perceived value by over 40%.
What is the exact difference between embossing and debossing?
The primary difference lies in the direction of the depth created on the paper surface: embossing pushes the material into positive relief (upward), while debossing presses an impression into negative relief (downward). Both processes require metal dies (brass or magnesium dies) and mechanical pressure applied to the paperstock.
Here are the main technical characteristics of both techniques:
- Emboss (3D / Relief): Requires two dies (male-female counter die) squeezing the paper in between, creating a visible impression on the reverse side unless duplexed.
- Deboss (Deep impression): Uses a single die to press the paper fibers down, ideal for thick cardstock over 400 gsm (like cotton or letterpress papers).
- Combination with Foil: Both techniques can be overlaid with metallic foil (combo foil embossing), frequently used on premium labels.
- Visibility: Embossing catches ambient light easily, while debossing delivers a subtle, shaded elegance.
How much does it cost to add foil stamping or spot UV to a print run?
The cost of special finishes comprises a fixed setup fee (die or screen production) and a variable per-unit cost. For foil stamping (hot foil), custom magnesium die creation costs between 30 and 80 EUR depending on square centimeter coverage, plus machine setup labor (around 20-50 EUR) and consumed foil. For 2D or 3D spot UV varnish, there is no metal die, but silk-screen preparation or digital equipment setup is billed (around 20-40 EUR), plus 0.05 to 0.20 EUR per A3 sheet. For instance, on a run of 500 business cards handled through professional design grafic services, a special finish adds a total extra cost of roughly 50-100 EUR compared to standard printing. As the print volume increases, the fixed cost per unit decreases significantly.
Can spot UV varnish be combined with matte lamination?
Yes, combining matte lamination with 3D spot UV varnish is the most popular and effective contrast technique in commercial printing. Matte or soft-touch lamination creates a velvety, reflection-free surface that glossy UV varnish sharply emphasizes. Without a protective lamination layer, spot UV applied directly to uncoated paper can absorb into the fibers or crack along fold lines. Furthermore, on dark stock or printed black backgrounds, glossy spot UV over matte lamination offers an extremely elegant black-on-black subtle effect. It is essential that the lamination film is corona-treated for varnish adhesion, otherwise the UV layer will flake off during handling.
What DTP artwork mistakes can ruin a foil or embossing effect?
Most errors stem from ignoring the physical limitations of finishing machinery and paper fiber behavior. When working on a creare logo project, keep in mind that ultra-thin lines or tiny text cannot be mechanically stamped onto paper under heat and pressure.
Key artwork mistakes to avoid:
- Lines thinner than 0.25 pt (0.08 mm): Heat and pressure cause foil bleeding or die deformation.
- Insufficient letter spacing: Tight typography fills in, resulting in solid metallic or embossed smudges.
- Sending raster artwork: Submitting finishing elements as JPG/PNG instead of 100% K vector shapes set to Overprint with dedicated spot color.
- Ignoring registration tolerance: Print-to-finish registration has a tolerance of 0.5–1 mm; avoid tightly outlining printed text with foil.
- Placing elements across fold lines: Foil and UV varnish will crack if applied directly across a heavy spine fold.
What is the minimum print run for special finishes to be cost-effective?
From a unit-cost perspective, the minimum recommended print run for traditional die-based finishes (conventional hot foil, mechanical embossing) is 300 to 500 pieces. Below this threshold, the fixed die cost is amortized across too few units, inflating the price per piece unrealistically. However, modern digital technologies (digital sleeking, digital spot UV) eliminate physical dies, making runs of 50–100 pieces or single packaging prototypes highly feasible. For projects showcased in my portofoliu, budget optimization relies directly on choosing between digital technology (zero die costs) and traditional methods (viable for runs over 1,000 pieces).
How do special finishes affect the legibility of small text?
Special finishes reduce text legibility, as they are engineered for visual impact on prominent elements rather than body copy. Text smaller than 7–8 pt stamped in gold foil becomes difficult to read due to high light reflection. Likewise, embossing small text distorts letterforms, rendering them as indistinct bumps. The gold rule in print design is to reserve special finishes strictly for titles, logos, icons, or accent patterns. For fine legal text, ingredients, or contact details, always rely on clean offset or digital printing with high-contrast flat ink.
How do you connect physical print finishes with your online presence?
Premium print and digital channels reinforce each other through hybrid touchpoints. From a business card embellished with spot UV and an embossed QR code, customers should seamlessly transition to a responsive site de prezentare. Moreover, brand name consistency across physical packaging directly supports online search indexing and geo-aeo-aio optimization, ensuring clear visibility across traditional search engines and AI engines alike. A professionally photographed foil-stamped package produces top-tier visual content for digital marketing campaigns, boosting online conversion rates.
What's next?
If you are planning a packaging project, new product line, or high-end brand collateral, setting up print files correctly from the start is crucial. I can assist you with graphic concept development, technical DTP preparation for metal dies, and paper substrate selection. Head over to the contact page to discuss your project details and receive a clear quote and timeline.